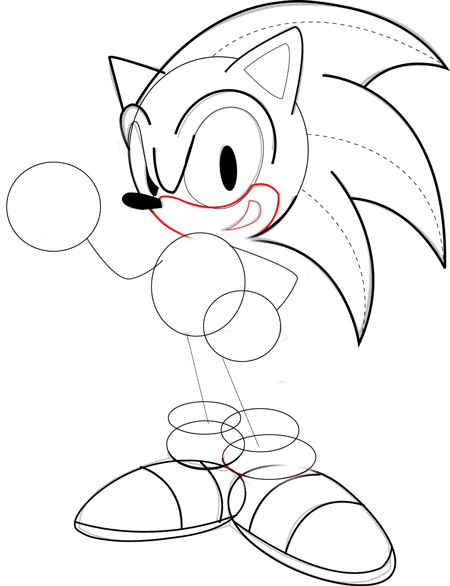
Sonic the Hedgehog, a blue hedgehog with unparalleled speed, holds a prominent space in the history of video game characters. With his spiky blue hair, red sneakers, and lightning-fast speed, Sonic is a character that captivates the imagination of artists and gamers alike. Whether you’re a seasoned artist or a beginner looking to improve your skills, this step-by-step guide will help you draw Sonic the Hedgehog and bring him to life on your canvas or sketchbook.
Materials Needed for this Sonic Drawing Tutorial
Before jumping into this ‘Learn How to Draw Sonic’ tutorial, it’s essential to confirm that you have all the necessary materials for this Sonic the Hedgehog drawing. For this easy Sonic drawing, you’ll need:
- 2mm Mechanical Pencil with 2B lead
- Staedler 4B Black Pencils (alternate pencil)
- Staedler White Non-marking Plastic Eraser
- Strathmore 89 gsm sketch paper
- Sharpie Fine liner (optional, for inking)
- Prismacolor Color Pencils
- OHUHU color markers
About this video tutorial
- The video provides tips and techniques on how to draw Sonic the Hedgehog
- The Cartooning Club Channel offers tutorials for beginners and experienced artists
- The channel covers a wide variety of drawing subjects, from superheroes to animals
- Viewers can learn to draw like a pro and join a community of passionate artists by subscribing and turning on notifications
- There is an option to support the channel by becoming a member
- The article includes a list of sketch, drawing, and coloring supplies recommended by the Cartooning Club
- The channel offers digital coloring tutorials using Adobe Photoshop
- The Cartooning Club channel has how-to-draw tutorials available for all artistic levels and age groups
- Viewers can support the artist by sharing the channel with friends and tuning in for daily tutorials
If you are looking for a complete step-by-step explanation of how to draw Sonic, look no further.
Step 1: Start with Basic Shapes
Begin with Basic Shapes: Start by sketching a circle for Sonic’s head at the top of your page. This will serve as the foundation for Sonic’s head. Then, add a curve beneath the head to represent the spine, sketching circles for the hip and adding lines to denote the legs and feet positions
Every good drawing starts with simple shapes to get the proportions right. Begin by drawing a large circle to represent Sonic’s head.
[embedyt] https://www.youtube.com/watch?v=YGp_xJal-y8[/embedyt]Step 2: Outline the body
From the basic head and spine shapes, extend lines to create Sonic’s body structure, including his arms and legs. For the body, add a smaller oval shape below the head, which should be about half the size of the head. Remember, Sonic’s body is much smaller in comparison to his head.
Use small circles to mark joints like elbows, knees, and the connections of the hands and feet.

Step 3: Sketch the Eyes and Nose
Sonic’s eyes are one of his most distinguishing features. On the horizontal guideline, sketch two large, almond-shaped eyes that almost touch in the middle. Draw a small oval for the nose, resting just below the point where the eyes meet.
Step 4: Outline the Face
Now refine the shape of Sonic’s face. Starting from the top edge of the head circle, draw a curved line down to where the circle meets the body oval. This creates Sonic’s cheek and chin. Then, move back up to sketch his other cheek on the opposite side.
Step 5: Draw Sonic’s Iconic Spikes
Sonic is known for his spiky hair. Draw long, curved triangles radiating out from the back of his head to create his signature spikes. Typically, Sonic has three on the back of his head and two on the sides.
Step 6: Add Arms and Legs
Draw two tube-like shapes for his arms with simple round shapes for the hands. Give Sonic gloves with cuffs by adding small circles at the wrists. For his legs, draw two longer tubes with large ovals at the ends for his shoes. Don’t forget the sock cuff detail on his shoes.
Step 7: Detailing the Shoes
Sonic’s shoes are iconic with their red and white color scheme. Outline the basic shape, then add the white strap and the golden buckle. Make sure to draw the soles and give the impression of his shoes having a bit of thickness to them.
Step 8: Final Touches on Features
Refine all the facial features: give Sonic his confident smile, his small, pointed ears, and the large pupils in his eyes that display his lively character. Add his glove details, such as the lines where his fingers would be.
Step 9: Clean Up and Ink
Erase any unnecessary guidelines and make sure your drawing has solid, clean lines. If desired, go over the drawing with a fine liner to create a more defined and professional look. Allow the ink to dry, and then carefully erase any remaining pencil marks.
Step 10: Add Color
It’s time to bring your drawing to life with color. Use blues for Sonic’s body, peach for his muzzle and inner ears, red and white for his shoes, and white for his gloves. Remember to leave small white highlights in his eyes to make them shine.
Conclusion
Congratulations, you’ve just drawn Sonic the Hedgehog! With practice, you can tweak and perfect your style. Remember that drawing is about expression and fun, so don’t be afraid to add your creative twist to this iconic character. Keep practicing, and enjoy the process!

