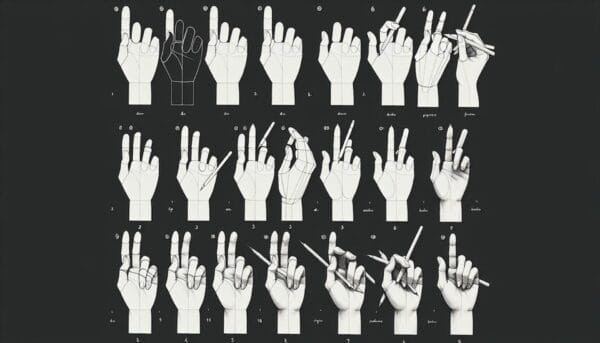
Step-by-step guide for artistically drawing hands, starting with basic shapes and finger outlines, then adding knuckles, detailing, and shading for realism.
1. Start by outlining the hand. Begin with a basic shape for the palm, such as an oval or a tall rectangle.
2. Add the fingers. There are typically five fingers on a hand, with the thumb being the shortest and the pinky finger being the longest. Sketch the location of the knuckles, and then, the fingers in proportion to the palm, making sure to leave space between each one.
3. Add details to the fingers. Draw the joints and knuckles, as well as the nails on each finger.
4. Draw the thumb. The thumb is shorter than the other fingers and is positioned lower on the hand. Make sure it is correctly proportioned to the rest of the hand.
5. Add shading and details. Shade the areas of the hand that would be in shadow, such as under the fingers or around the knuckles. Add wrinkles and creases to give the hand a more realistic appearance.
6. Erase any unnecessary lines and refine the drawing. Make sure the proportions are correct and that the hand looks natural.
7. Add any additional details, such as rings or bracelets, if desired.
8. Once you are satisfied with the drawing, you can add color if you like, or leave it in black and white.
Check out this video to visualize different stages of the process in a sequence, demonstrating the evolution from rough lines to a detailed hand. Each stage includes a concise description, presented in a simple, clear, and tutorial style.
Understanding Hand Anatomy
Before you begin drawing hands, it’s essential to have a basic understanding of their anatomy. Hands are complex structures made up of bones, muscles, tendons, and skin. Each hand has 27 bones: the carpal bones (wrist), metacarpal bones (palm), and phalanges (fingers). Observing how these bones connect and move together will help you capture the hand’s structure accurately.
Study the proportions of the hand, noting how the fingers have three phalanges, except for the thumb, which has two. Look at how the skin folds, where knuckles are prominent, and note the patterns of creases on the palms. Drawing from real-life models or your hand will assist you in becoming familiar with these details.
Basic Shapes and Proportions
Every complex figure can be broken down into simple shapes and hands are no different. Start by sketching the palm with a square or rectangle. Then, add cylinders or elongated ovals for the fingers and a smaller oval for the thumb. Remember that hands are three-dimensional, so you’ll need to depict them with some perspective.
When it comes to proportions, remember that the fingers (when together) are about the same width as the palm. The middle finger is usually the longest, and the thumb originates lower on the wrist than the base of the palm. When drawing hands, always begin with light lines to easily make corrections.
Adding Detail and Realism
Once you have the basic shapes and proportions mapped out, start refining your drawing by adding details like knuckles, fingernails, and the lines on the palms and fingers. Look closely at where shadows and highlights naturally occur, as this will give your drawing more depth and realism. Use shading techniques like hatching, cross-hatching, or blending to denote different textures and reflect the contours of the hand.
Keep practicing with hands in different positions, such as holding objects, in a relaxed state, or making a fist. This will improve your ability to draw hands in various actions and perspectives.
Creating Dynamic Poses
Dynamic hand poses can express a wide range of emotions and actions. To master these, begin by understanding the range of motion in each finger. Practice sketching quick gestures of hands to capture the essence of movement. Don’t get caught up in the details; focus on the overall flow and energy of the hand.
Pay attention to how the skin stretches or bunches up in different poses. Note that the back of the hand is often convex, while the palm can cup inwards. Use these subtle cues to infuse your drawings with life and dynamism.
Practice and Persistence
Like any skill, drawing hands well requires practice. A common exercise is to sketch your own hands in different positions every day. You can also challenge yourself by drawing the hands of others, capturing the unique aspects of each person’s hands.
Another helpful practice is to recreate the works of masters who excel in drawing hands. Analyze their techniques and incorporate what you learn into your work.
Remember, it’s okay to make mistakes. Each attempt provides valuable lessons that will improve your skills over time. With consistent practice and a keen eye for detail, you will master the art of drawing hands.
Concluding Thoughts
Drawing hands is a skill that many artists find challenging, but with the right approach, it can be mastered. Understanding hand anatomy, breaking down the hand into basic shapes, adding details for realism, creating dynamic poses, and relentless practice are all keys to success. Embrace the learning process, celebrate your progress, and continue to refine your technique. With time and patience, the art of drawing hands will become an enjoyable and rewarding part of your artistic repertoire.


